Are you looking for ways to change the color of the Shopify Add to cart button?
Then you are not alone.
When customizing product pages, a significant number of people leave the cart button as it is. Even when its color doesn’t match the brand or item in question.
Psychologically, there’s no doubt that color can have a profound effect on people.
Mary Fernandez from OptinMonster
With the right color, some Shopify owners have experienced over 30% rise in conversion rate. So, there should be no doubt about the importance of choosing and testing the color of your “add to cart” buttons. That’s why I have prepped this step-by-step tutorial to spare you frustration.
Changing the “ATC” button color from the theme editor
This is the simplest way to change the color of the cart buttons in your store. For this, just take the following steps:
Step-1
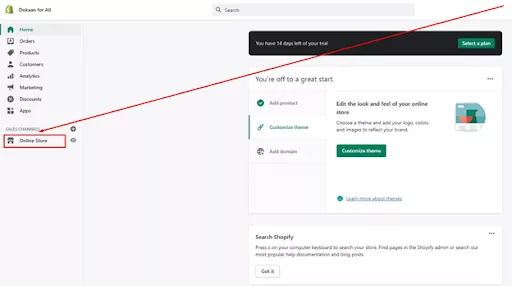
Go to the “Online Store” page after logging in to your Shopify dashboard.
Step-2
Next, click on the “Customize” button shown in the screenshot below.

Step-3
Clicking on the “Customize” button will take you to the preview of the theme you have chosen for your Shopify online store. Once you are there, click the “Home page” button on the center top. From the drop-down menu, choose “Products”.

Step-4
From the “Products” section, choose “Default product”. Depending on the theme, you may see a list of products present in your store. Since I am using a fresh Shopify account, mine is showing “Default product”.

Step-5
Once you are on the “Default product” page, click on the “Theme settings”. Doing so will reveal the theme settings options (marked by the red box).

Step-6
See the “COLORS” option at the top inside the red box? You will need to click that.
Step-7
In the colors panel, you will see the colors of background, headings, body text, buttons, button labels, and everything else. You will need to change the color of the “Buttons”. The color code is in hex format.

To change the color of the “ADD TO CART” button, you will need to place the hexa code of your preferred color.
You can find the code at the HTML Color Picker page from W3 Schools.
If you find it a hassle, then just relax. You can also do it by clicking the rectangular black box on the left of the text “Buttons” (shown in the image below).

Choose any color you want using the rainbow slider and the color picker and the button color will change. For the purpose of this tutorial, I have chosen orange color. You can see the new button color in the video below.
Change the color of Shopify add to cart button using code
The Brooklyn Shopify theme editor doesn’t let you change the background color of the ATC button. But there is a way to do it. Disclaimer, it involves just 1 line of CSS code. Just follow the steps below.
Step-1
Open the product page preview by following steps 1-4 of the method above. If you are using the Chrome browser, then press Ctrl+Shift+I. The HTML code of the page will open in a window on the right or at the bottom of the page.

The same will happen if you right click on the page and choose “Inspect”.

Step-2
Now, click on the tiny arrow (shown in the image). You can also press “Ctrl+Shift+C”.
Step-3
You will now be able to choose the element on your Shopify product page that you want to inspect. Hover your mouse to the Add to Cart button and click it. It will show you the code in the window below.

The “ADD TO CART” button has a type called “btn–secondary” Locate this text in the yellow box and copy it. it should say something like “.bt–secondary”.
Step-4
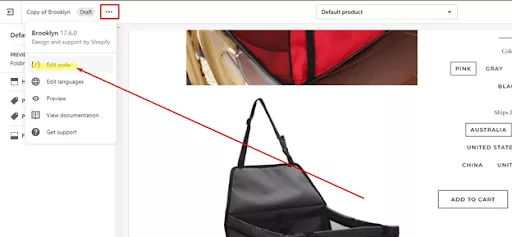
Copied the text? Now you will need to go to the theme files by navigating to the “Edit code” option.
Step-5
Once there, you will need to find the “theme.scss.liquid” file. This is where all the CSS codes of your Brooklyn Shopify theme are stored. Depending on your theme, this file may also be called “theme.css”.
Now press Ctrl+F to open the text search box. Remember the text “.bt–secondary” that you copied? You will need to paste it here. You can see this text highlighted yellow in the image below.

Step-6
In this section, below the “font-size” line, add the following line: “background-color: green!important” (shown in the image below).

In place of “green”, you can put any other color. The “!important” part makes sure that the color you are putting in the code is the only color the “ADD TO CART” button gets. Since this CSS file is a global file, any change you make is implemented on all the add to cart buttons in your Shopify store.

See! The “ADD TO CART” button is now green. If you write “orange” instead of “green”, the “ADD TO CART” button will be orange. You can see it in the video below.
There are other ways to change the add to cart button color.
You can pick this article for animate add to cart button: How to animate Shopify add to cart button easily? (Free method)
That’s true.
When you change the cart button’s color, you can see that the background of the “BUY IT NOW” button changes as well. In my next tutorial, I will show you how you can change just the button text color and font size of your Shopify ATC buttons.
I will also show you how you can make your “ADD TO CART” button larger to make sure visitors can easily notice it and click on it.


)