Store owners can instantly create sitemap in Shopify store name as sitemap.xml files. These files essentially hold links to all website products, product pages, images, collections, and blogs. Search engines, such as Google and Bing index your website based on these files.
Thereby, the pages of your store surface on the SERP. So, submitting the sitemap files to Google is crucial. — As you submit those files to Google Search Console, Google tracks and indexes pages on your site. Our Shopify specialists explain how to add a sitemap in Shopify store.
What do sitemaps offer?
After you move through this write-up, you will definitely locate the sitemap index files on your Shopify store. The parent sitemap or sitemap.xml index file comprises one and all website links. Links are classified by page types. Those links are termed child sitemaps.
How to add a sitemap in Shopify store?

On the Basic Shopify plan, your website’s primary domain generates sitemap files. Search engines can identify those sitemap files.
— On Shopify/ Advanced Shopify/ Shopify Plus plan, you can tap into the international domains feature. It helps you generate country or region-based domains. International domains help you produce sitemap files for all of your domains. Again, search engines recognize all domains except that they redirect to the primary domain.
The crawling and indexing processes always drag their feet through the website, taking a lot of time. Search engines including Google offer no specific time frame in this respect. The Google Search Console Help provides insights on what comes when your site gets indexed from it.
How to detect Shopify sitemaps?
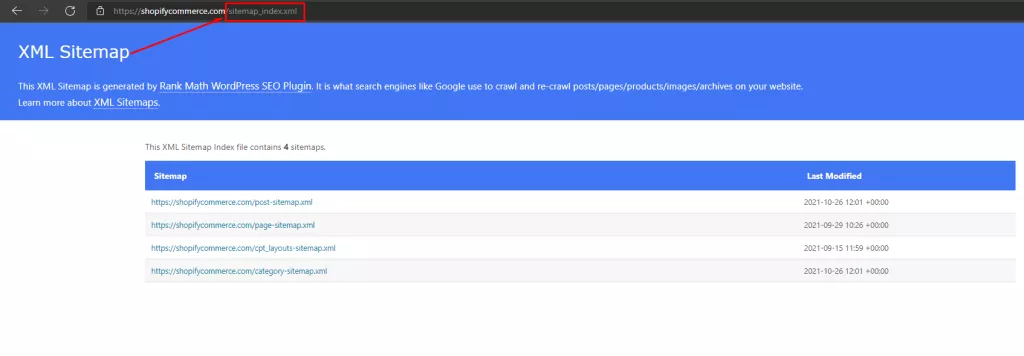
Sitemap files need no careful coordination as they are automatically produced. Trace them at the root directory. All Shopify store domains contain the root directory.
Individual sitemap files link up to distinct sitemaps for collections, products, blogs, and webpages. Also, these files get updated on their own as you introduce a new blog, webpage, product, image, collection, or blog post on your online store.
—You are privileged with a sitemap for the primary domain in case you are a Shopify Basic customer. However, Shopify and other higher plans allow sitemaps for additional domains, catering to your international requirements. If your multiple domains are idling around instead of international targeting, redirect them to your primary domain.
still you don’t know how to open shopify store you can look this article : Create a successful Shopify store in 30 minutes
How to add domain properties & verify sites with Google?
First, verify your domain with Google Search Console. It clears up the air about your ownership of the Shopify store. Create an account on Google Search Console Account if you have none.
Then disable the password protection for the Shopify store. It expedites the domain verification process. You can disable the password protection only to re-activate it following the domain verification phases. Finish this task before you launch the website.
Follow these guidelines to the point:
- Open your Google Search Console account → click ≡ → select Add Property from the drop-down menu.
- Select URL prefix & enter the property domain including the https:// section from the select property type → click Continue.
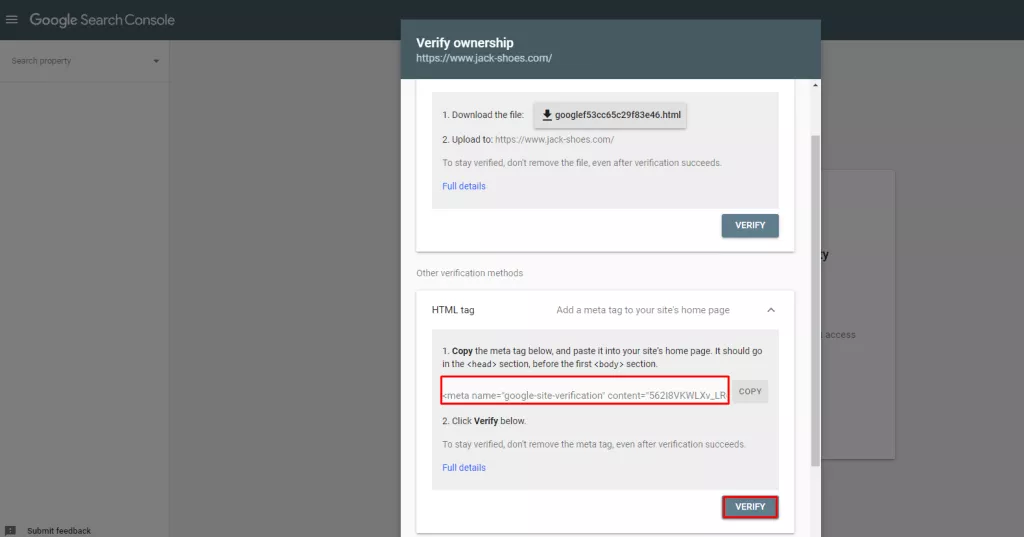
- Select HTML tag on the Verify Ownership window. Learn more about verifying ownership with a TXT record.
- Highlight full HTML tag → copy it to your clipboard with cmd + c on a Mac or ctrl + c on a PC. Make sure you select everything, including the < and >. For example:
<meta name="google-site-verification" content="IV7BPLESttSpBdxSWN1s4zlr4HIcuHkGQYmE3wLG59w" />Then —
1. On your Shopify admin, go to Online Store → Themes.
2. Find your preferred theme → click Actions → Edit code.
3. Go to the Layout section → click theme.liquid → paste the meta tag that you copied in step 5 on a blank line directly below the opening <head> tag → Click Save.
4. Return to Google Search Console → click Verify.
Place your sitemap file on Google Search Console
Google can find and index your website pages once you submit your sitemap file.
Here goes the process:
- Following the site verification, go to Google Search Console → click Sitemaps.
- In the ‘Add a New Sitemap’ section, enter your domain’s sitemap file name → click SUBMIT. Your domain’s sitemap should resemble this format https://www.jack-shoes.com/sitemap.xml. A half-done sitemap URL triggers an error message from Google.
You must submit individual sitemaps against each domain if you are using international domains on Shopify or higher plans. Your website’s root directory contains sitemap files.
— Multi-language sales automatically add those languages to the sitemap files against individual domains. It is beyond your control and is not subject to your actions.
Google uses sitemap files to crawl and index your Shopify store following your sitemap submission. The crawler needs accessibility to the website to function properly. Password protection deters the process. Therefore, you must deactivate the store’s password.
Conclusion:
Our Shopify experts have outlined a clear guideline for you. Now, you have mastered the purpose of sitemap.xml files on your Shopify store along with its basic features. Sitemap.xml files have fundamental functionality on your website.
— They invite Google to crawl your website content. Enormous eCommerce websites cannot do without sitemap.xml files. The standard navigation framework of Google takes too much time to track and crawl content on massive eCommerce stores.


